Among the options for creating a fine art or professional photo book are page layout tools included in Adobe Lightroom and Apple Aperture. But how well do these tools work? In previous posts in this series, I covered choosing page layout software if you want to DIY, and how to hire a book designer if you don’t want to DIY. This week I cover Lightroom’s photo book creation tools—another DIY option. Next week I will cover Aperture’s.
Adobe Lightroom and Apple Aperture both serve the same function: organizing and editing digital photographs. They both have robust tool sets for converting from RAW camera files, tagging and organizing photos, performing most image editing tasks, and printing single images. They also both have tools for creating photo books.
I had originally intended to make this post a comparison between the book tools in Lightroom and Aperture, but I decided that didn’t make any sense. If you already own either of them, it seemed to me unlikely that their respective book tools would be a reason to switch. And if you were choosing de novo between one or the other, their respective organizational and editing tools are a more important basis for comparison than their photo book tools, because you’ll be using them constantly. Finally, Apple has recently announced Aperture’s end of life: its functions are to be merged into a new Apple app called Photos, along with those of the amateur-oriented iPhoto app. (How that is going to affect technically sophisticated Aperture users is unknown.) So I’ve dropped the idea of a head-to-head comparison: this post is just about Lightroom’s photo book capabilities, and my next will be just about Aperture’s.
My intent here was not to provide a detailed how-to-create-a-photo-book guide for Lightroom, but to evaluate Lightroom’s photo book features for the purposes of creating a professional-quality printed book.
Exploring Two Uses of Lightroom’s Photo Book Tools
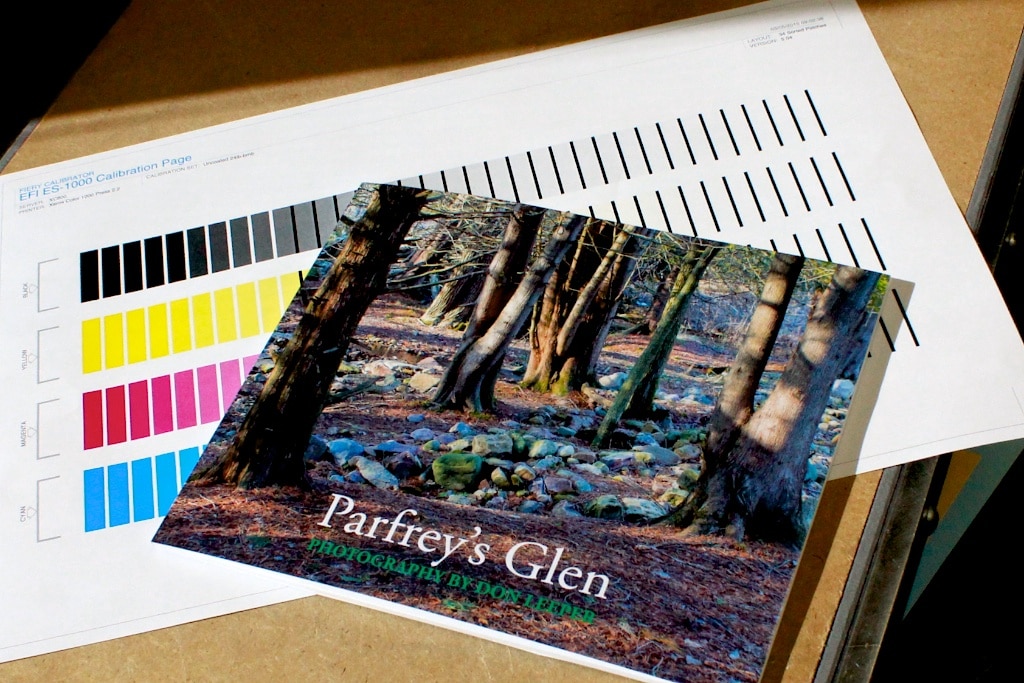
The POD company Blurb is Adobe’s print partner for Lightroom: you can order printed copies of your photo book from Blurb directly from the Lightroom application. But like all POD companies Blurb has limitations. So I tested two ways of using Lightroom’s photo book layout tools: 1) laying out the book and ordering the printed books from Blurb directly through Lightroom, 2) laying out the book and exporting a PDF file for printing somewhere other than Blurb. The second option is worth considering if you want more than a couple of dozen books: compared to a POD service like Blurb, printing at an SRDP or offset printer can definitely be a better choice in terms of cost, printing options, and possibly quality. For the latter experiment, I went as far as printing the cover and interior files exported from Lightroom on our own digital presses, so I could test the book files exported by Lightroom.
I have been an Aperture user for several years. I began this test totally new to Lightroom. As I worked my way through the test, I was actually quite pleased with Lightroom’s interface and tool set—it seemed in many ways more logical than Aperture’s. In particular, the arrangement of tabs across the top—Library / Develop / Map / Book / Slideshow / Print / Web—seem to me to be perfectly matched to the actual way a photographer works. Good news, as I may very well be switching, depending on what the new Apple Photos app turns out to be!
Because I don’t have a book’s worth of images on a single theme, I put together a collection of non-related images for testing purposes: landscapes, mostly, but also a couple of portrait collages. I used both color and monochrome images. (If you’re interested, the images were created on a Canon 60d, a Fuji X-E1, and a Sony A7r.)
Making a Photo Book in Lightroom 5
Like the workflow-organized tab layout in Lightroom, the initial creation of a photo book in Lightroom is quite straightforward. Here’s a somewhat simplified explanation:
- Create a collection containing the photos you want to put in the book. Name the collection something logical like the title of the book. (A collection is Lightroom’s name for an easily-created grouping of photographs.)
- Put the photographs within the collection in the order they will appear in the book.
- With the collection open, select the Book tab. Depending on how you’ve set Book preferences, the book is automatically created and photos poured into the pages.
- Select the book’s page size, paper stock, etc. from the Book Settings panel on the right.
- Click Create Saved Book.
Voilà! Instant photo book. However, there are some wrinkles…
Wrinkle 1: No CMYK Soft Proofing Capabilities
Soft proofing is important when sending a book to be printed at a POD service, a SRDP printer, or an offset printer, because it gives you an idea what is going to happen when the RGB colors in your images are converted to the smaller range of colors in the CMYK color model used by all commercial presses. The process is pretty simple:
- Calibrate your monitor using a gadget like Datacolor Spyder4PRO or X-Rite ColorMunki Display. Monitors vary wildly in how they display colors; calibrating helps by setting up the color rendition to a standard so soft proofing is more accurate.
- Load the ICC CMYK color profile for the destination press. You can use an industry-standard profile like GraCol, or use one provided by your printer.
- Select the soft proof view in your image editing software to get a pretty good idea of how each photo will look when printed CMYK. It will not look exactly as it will when printed, but at least you’ll see the major color shifts and be able to adjust your photo to optimize it for CMYK printing.
The wrinkle with Lightroom is that it does not support CMYK and so is useless for soft proofing. My way around this was to go back to the Library, select each image individually, and use the Edit In / Edit in Adobe Photoshop option. I used Photoshop’s CMYK soft proofing capabilities to tweak each image and saved them back into Lightroom. This is pretty easy to do, but a bit of an irritation. Also, when you export your file from Lightroom, it cannot save it with images converted to CMYK, which is in fact the workflow Blurb recommends from a color management perspective. So CMYK soft proofing in Photoshop for purposes of making a photo book in Lightroom is dubious. Clearly the lack of CMYK profile support is a way to support product differentiation between Lightroom and the more expensive Photoshop, even though now they are bundled together in the Creative Suite Photography subscription option.
Wrinkle 2: Clunky and Imprecise Page Layout Tools
As mentioned above, it is very quick to create a roughed-in photo book. Once you arrive at this point, however, you’re going to want to go in and tweak layouts so it looks like a real book. Even though the book I was creating was just a test, part of that test was to see how hard it would be to make it look like a professionally-produced book. Once the book was roughed in, the process bogged down. The page layout tools were not particularly intuitive, and, worse, lacked any kind of precision in terms of locating images and type elements on the page. A dedicated page layout program like Adobe InDesign or Quark Xpress has a robust suite of tools enabling book organization and ensuring that page elements are positioned precisely from page to page: grids, guidelines, master pages, positioning controls down to thousandths of an inch, etc. This all matters, because one highly visible tipoff of a poorly produced book is when something that is supposed to be in the same place on every page bounces around when you flip through the pages. (This can also happen as a result of printing and binding imprecision, but if you don’t start with things aligned, they are certainly not going to wind up that way in the final product!)
When laying out the pages of the test book, I found myself awkwardly nudging image and type boxes around. There are center guidelines that show up somewhat unpredictably when an element is centered, and the other layout tools are extremely limited. Precisely defined master pages would have been awesome. Also, in the process of laying out pages, I wound up deleting images and then re-placing them on the page, so the super-fast auto-page-creation was not that useful in the end.
Printing Through Blurb
Once I finished laying out my 24-page photo book, ordering printed copies from Blurb directly through Lightroom was easily accomplished by stepping through typical eCommerce checkout screens.
The Result: Printed Books
I received the two copies of the photo book I had ordered through Lightroom eight days later. They were well packaged and in perfect condition. Being a printer myself, I was pretty curious about how they would look. I was impressed at first. The cover printing and binding were first-class, with gloss film lamination protecting the paperback cover from the usual handling insults that books receive. The book opened and paged easily, though I noticed that there was one aspect of the cover that would never pass muster if produced at a regular book printer: the paperback cover stock was cross-grain.
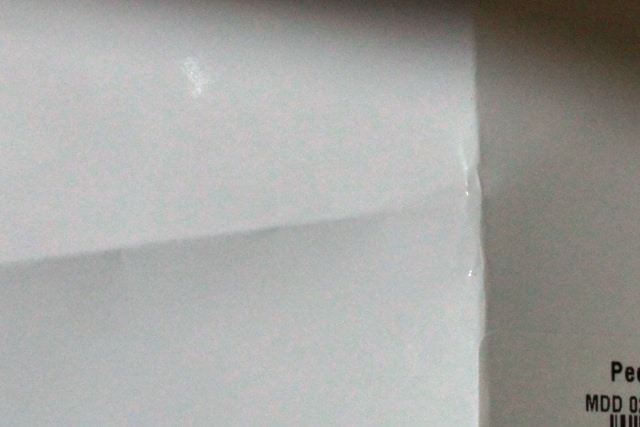
Photo book back cover, creased to show paper grain. The vertical crease is parallel to the spine of this photo book. It is irregular because the grain of the paper is perpendicular to the spine. The smooth horizontal crease runs with the grain. Running grain parallel to spine is fundamental to a well-bound book.
All machine-made paper has a grain direction resulting from the way the paper fibers orient themselves as the slurry of wet wood pulp is transported through the papermaking machine. Although this grain is not visible in the finished paper, it makes a big difference in which way the paper wants to curl. A book page turns easily if the grain is parallel to the spine of the book; it fights against being turned if the grain is perpendicular to the spine.
I tested the cover of the Blurb photo book by creasing the back cover parallel to the spine. If the grain is parallel to the spine the crease will be smooth, if it is perpendicular to the spine the crease will be lumpy and irregular. The result was clear: the Blurb cover was printed and bound with the grain perpendicular to the spine, a distinct quality demerit. Book publishers have had printers reprint orders of thousands of books for violating this rule!
The Blurb photo book was helped by the fact that the cover was laminated, which tempers the wrong-way curling somewhat, and by the fact that the interior pages were bound with the grain correct. (The photo book I created through Aperture, by the way, was also bound cross-grain, and it was much more apparent, with a significant crinkle at the spine caused by the grain fighting the binding process; and the effect was exaggerated by the fact that the cover was not laminated.)
The printing of the interior of the Blurb book was a little less impressive than the cover printing, partly due to the text stock I had selected. The uncoated stock had a pronounced texture to it. This is not bad in itself, but the texture along with absorption of inks into the uncoated stock flattened the dynamic range of the photos: the darkest blacks were more like dark grays. Sharpness was good. Color was good for a first pass.
Overall I was pretty impressed with the printing, apart from the cross-grain cover. If I were to use Blurb again I would try one of their coated stocks, I think, although that is more of an aesthetic choice than a quality concern.
Workflow: A Quandary
The normal process for high-quality book printing is that the printer shows the customer color proofs showing how the cover and pages are to print, before the book is actually put on press. At an SRDP printer—at least here at Bookmobile—these proofs are printed on the actual press that will print the book, so they are an excellent representation of how the book will print. We even laminate cover proofs so that they will show the slight color shifts that happen when a cover is laminated. Offset printers provide proofs printed on high-quality inkjet printers that are precisely calibrated to emulate the color gamut of the offset press that the book will print on. With these proofs in hand, the customer can make changes to the color or have the printer make changes. The printer will then make another set of proofs. Only when the customer approves the proofs will the book be printed. The press operator then uses the approved proofs as a reference when setting up the press to ensure that the actual book resembles as closely as possible the proofs the customer has seen and approved.
With a POD printer like Blurb, it is not possible to emulate the workflow used for SRDP and offset, because ordering, printing, and binding are all automated. Although the digital presses are no doubt frequently calibrated, even the best-calibrated digital press varies subtly from day to day. Besides that, it is probably highly likely that if you order a copy of a book and then later order more copies, the new copies will not be run on the same press. Finally, the operators are certainly not comparing what’s coming off the press to an approved proof and adjusting the press accordingly. What I saw in my test with Blurb was pretty good, but if I’m going to invest in an edition of photo books that is more than a handful of copies, I’m going to want to optimize image quality via the proof review process to match my vision of how the photos should print. The POD workflow does not allow this.
The other issue with POD for longer runs is cost: for run lengths between 50 and roughly 1,000, POD is going to be much more expensive than SRDP; and for more than 1,000 copies—roughly—offset will beat them both. (I discussed choosing printing method based on the number of copies in this post.)
Using the Lightroom Photo Book Feature to Print at an SRDP or Offset Printer
My other thought was that if you could get a printable photo book file out of Lightroom, you could print it at the SRDP or offset printer of your choice and not be limited to Blurb. So I gave it a try.
Exporting a photo book PDF from Lightroom was easy. With the Book tab selected, select PDF in the Book option in the Book Settings panel on the right hand side of the screen. The Send Book to Blurb button at the bottom turns into an Export Book to PDF button. Click it and the book is exported into two files, a cover file and an interior file. Simple, but the resulting PDF had a fatal flaw: no bleeds.
A “bleed,” in printer’s parlance, means that an image or area of color runs off the edge of a page. Almost all paperback covers and dustjackets bleed; many, but not all, illustrated books have interior images that bleed. In order to accomplish a bleed the printed area is extended beyond where the final book pages will be trimmed. When sending PDF print files to a printer, in order to accomodate a bleed the extended print area must be preserved in the PDF. The Lightroom photo book PDF export not only didn’t extend the bleeds beyond the edge of the page, it actually resized the page area from the 10″ x 8″ size I chose—and which Blurb printed, no problem, with bleeds—to 9-5/8″ x 8-1/4″. This can only have been deliberate: presumably they want to funnel the printing orders to Blurb, which no doubt pays Adobe for referring the business to them.
There is a workaround: create the photo book with a page size larger than the one you want to end up with, and then fiddle with the layout so the text and image elements land where they ought to. Given the previously-mentioned paucity of precision layout tools, this would be a challenge.
Aside from the non-trivial bleed issue, the exported PDF was printable if one of our color exports tweaked the file. We successfully printed out pretty good first-pass page proofs, and could have brought them up to snuff with an investment of color correction time, were it not for the missing bleeds and cropped pages.
Adobe Lightroom Photo Book Creation: Pros and Cons
Pros
- Low cost (if you already own Lightroom, the photo book layout tools are free).
- Ease of ordering printed copies from Blurb: very slick!
- Blurb’s printing and binding was pretty good, apart from the cross-grain cover.
- Blurb’s packaging was excellent.
- The order arrived reasonably quickly.
- PDF export was easy, though flawed.
Cons
- Clunky and imprecise layout tools.
- CMYK soft proofing only available by switching to Photoshop, and effectiveness of this hard to evaluate.
- Very limited selection of page sizes.
- Blurb printed the cover cross grain.
- The Blurb workflow is dubious for optimizing image printing quality through the proof approval process.
- The cost of printing through Blurb is high for longer runs compared to SRDP and offset.
- Many fewer printing options through Blurb compared to SRDP and offset.
- The PDF export for printing anywhere other than Blurb is non-functional if there are any bleeds.
- The page is cropped down from its specified dimensions in the exported PDF.
Conclusion
Using the Lightroom photo book tool set is about accepting limitations: limited layout control, limited page size control, limited choice of printing service, limited printing options. If you can work within those limitations, have no inclination to purchase or learn InDesign, and only need a few copies printed, it is not a bad choice at all. Otherwise I would check out your other options for design and printing.
Need a quote or more information?
Request a printing quote here.
I’d be happy to answer questions—you can contact me via email.
Don Leeper is founder and CEO of Bookmobile, which has provided design, printing, eBook, and distribution services for book publishers since 1982. He set up his first darkroom in a basement bathroom in fifth grade and has worked as a professional photographer. He continues to satisfy his love of photography through appreciation of great images, an interest in photographic technology, and trying to improve his own photography.