Dust jackets are the most difficult book components to size. Simple seeming, they are actually complex three-dimensional objects once they are wrapped on a book. A poorly fitting dust jacket is immediately obvious and is guaranteed to create that sinking feeling of disappointment in a designer’s heart. Last week, I covered sizing paperback covers; this post is about laying out your dust jacket files in InDesign or Quark so that they fit properly. It is not a post about color theory or design or typography, just nuts and bolts book geometry.
Two Recommendations Right Off the Bat
Terminology
How Hardcovers Differ From Paperbacks
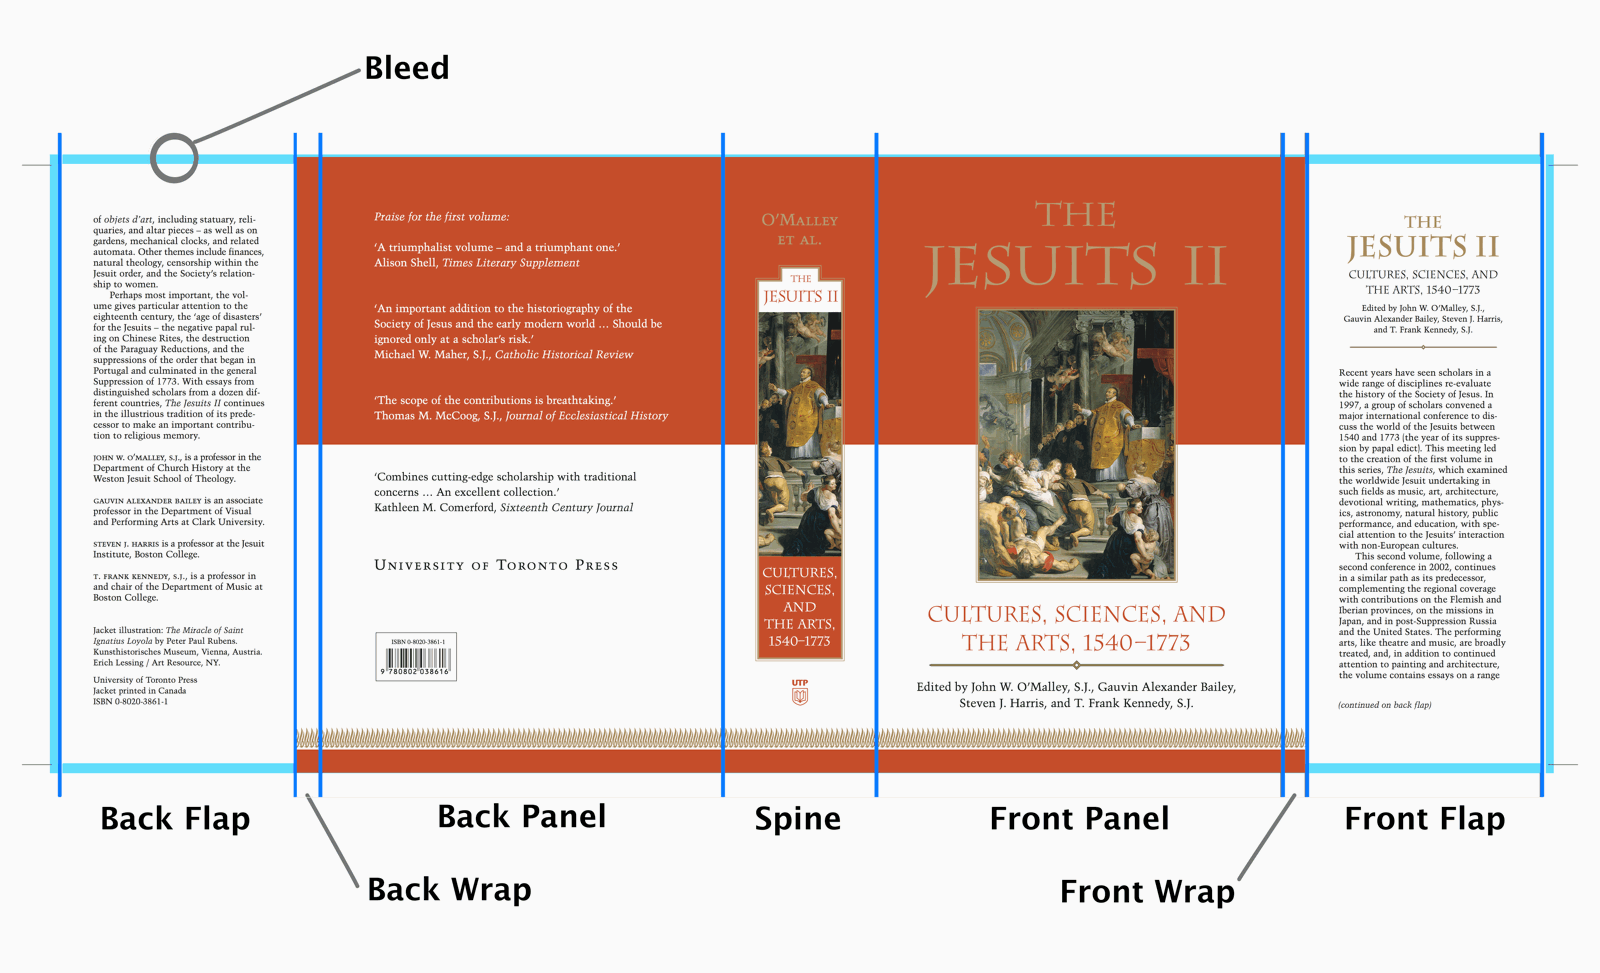
Parts of a Dust Jacket
A Dustjacket Template
Asking for Trouble: Running Critical Design Elements to the Edge of the Jacket
Asking for Trouble Part Two: Wrapping an Image Around the Front Panel, Spine, and Back Panel
Checklist for Dust Jacket File Prep
Two Recommendations Right Off the Bat
- Don’t even think about laying out a dust jacket without first getting a template from your printer.
- If there is even the slightest doubt about how design elements will center or align on the completed book, print out a 100% sized dummy of the jacket and wrap it on a book of the same page size and casebinding specs. Print the dummy in parts if necessary and splice it accurately with tape. Black and white is fine: you’re looking at fit, not color. Page count will likely vary from the book you’re designing, but you can wrap the front first, see how it looks, then the back. Then if you get the spine right you’re golden. Frankly, when I was designing jackets I was burned so many times on fit I started doing wrap dummies for every new hardcover.
Terminology
In book databases, conflicting terms are used to denote the dimensions of a book. In one database, for example, the term for the distance from the top of the front cover to the bottom is “height”; in another, the same measurement is “depth.” Here’s the terminology we use, which is based on printers’ customary practice:
- If the book is standing up with the front facing you, width is the horizontal dimension from spine to foreedge, and height is the vertical dimension from top to bottom. The top of the book is the head, the bottom is the tail.
- Now turn the book so the spine faces you. Spine width is the horizontal dimension of the spine. This is, obviously, the same as the distance from the surface of the front cover to the surface of the back cover, i.e., the thickness of the book.
I’m going to show you how to come up with the measurements for your dust jackets yourself. However, to reiterate my earlier recommendation: have your printer provide a template showing you the exact dimensions of your dust jacket. (At Bookmobile, contact your customer service representative.) That way, it is up to the printer to make any tricky calculations and check with you if anything is off with your dust jacket file. As long as you provide a file exactly matching the dimensions specified on the template, it is their responsibility to print and wrap the jacket correctly. Any real book printer can provide a dust jacket template. Templates are based on the exact text paper, cover material, and page count you specified when you requested a quote or ordered the job; if either one changes for any reason, you will need a new template from the printer. Also, be sure to include roman-numeraled frontmatter pages and any blanks in your page count total: they all count when you’re printing and binding!
How Hardcovers Differ From Paperbacks
A paperback book is a simple object: the cover fits neatly to the book block, they are trimmed at the same time, so sizing is straightforward. Hardcovers have parts that paperbacks don’t, which affect sizing:
The front and back boards
These are binder’s board sheets, which, when covered in cloth or other material, form the case. The boards are larger than the book block, so that they overhang it at the head, the tail, and the foreedge. Consequently, the front and back panels of a dust jacket will be larger than the page size of the book. Also, because the boards have significant thickness—around 1/8″—the dust jacket must be sized so that the area where the jacket wraps around the foreedge of the boards is sufficient.
The joint
The joint is a hinge formed by the cover material at the point where the front and back boards connect to the spine.
Parts of a Dust Jacket
The Flaps
The flaps are the ends of the dust jacket which, when folded around the foreedge of the front and back covers, secure the dust jacket to the book. They also traditionally have information about the book printed on them: a marketing description on the front flap, and author bio, along with publisher information, on the back flap. Flaps are typically 3-1/2″ to 4″ wide, and are the same height as the case.

If the wrap is not extended by at least 3/8-inch beyond the turn of the cover, the white area of the flap will show next to the foreedge of the book block, as in this example.
The Wraps
The wraps, as we call them, are the areas between the front panel and front flap, and back panel and back flap. The reason this is defined is that if the front and back panels have background colors (or images) that continue to the foreedge of each panel, they must continue onto the flap: putting the edge of color right at the edge of the board would result in an unsightly white line when the book is closed. If it is light enough to run type over, the background color can cover the whole flap. Otherwise it is run another 3/8″ or more beyond the edge of the board, in order that white not show between the foreedge of the book block and the color area (see photo).
The Front and Back Panels
The front panel is what you see when you are looking at the front of the book. On a finished hardcover, it is the size of the pages plus 1/4″ vertically and 1/4″ horizontally. That is, on a hardcover whose pages are 6″ x 9″, the front panel will be 6-1/4“ wide and 9-1/4“ in height. The back panel is exactly the same size. Double check this! You would be surprised at how often we get a cover or dust jacket file laid out for one page size, while the file for the interior of the book is laid out at a different one. While our interior and cover preflight departments work together to make sure sizes are accurate, you’ll save time and probably some rework charges if you check them before submitting them.
The Spine
On a dust jacket, the spine is the height of the pages plus 1/4″; for example, on a book with 6″ x 9″ pages, the spine height is 9-1/4″. The spine width is more complicated, as it depends on the number of pages in the book, the pages-per-inch (PPI) of the paper the pages are printed on, plus an allowance for the thickness of the boards. The formula is:
Spine width in inches = (Number of pages / PPI) + allowance for boards
For example, if a book has 600 pages, the text paper is 400 PPI, and the allowance for the boards is .25″, the spine width is calculated as follows:
1.75″ = (600 / 400) + .25
1.75 decimal inches ≈ 1-3/4 fractional inches
It is critical to get the spine width as close as possible to the actual width of the bookblock plus boards. Because humidity and different manufacturing batches affect the actual PPI of the paper, whatever the nominal PPI, the printer should double-check the spine width and fine tune as necessary. We do.
The Bleed
Absent in the final dust jacket is the bleed, which is removed in the final trimming. Unlike paperback covers, which are trimmed simultaneously with the book block, dust jackets are trimmed prior to wrapping on the book. Bleeds, however, perform a similar function on both. If an image is supposed to visually run off the edge of the dust jacket, if we extend the image into the bleed area we can be confident that when the jacket is trimmed, we will not accidentally have an unsightly, probably crooked, white line along the edge. Without extending the area of the color or image into the bleed we would stand about a 50 percent chance of having such a blemish. In any case, it would be extremely unlikely that a dust jacket could or would be printed on a sheet matching its final size: there is always extra around the edges to trim off.
As with paperback covers, sometimes an image on a dust jacket, when sized just right, doesn’t extend into the bleed. The solution is to clone a strip of the image along the edge, flip the clone so that it is a mirror image of the edge of the main part of the image, and nudge it over into the bleed, butting the clone up perfectly to the edge of the main part of the image. Any imprecision in trimming will be completely invisible. However, if there is an identifiable object at the edge of the cover–the top of a head, for example–a mirror-image clone can create peculiar artifacts. In such cases, more extensive image retouching will be called for.
The normal width of a bleed is 1/8″. Be sure to check “include bleeds” when you create the PDF file!
A Dust Jacket Template
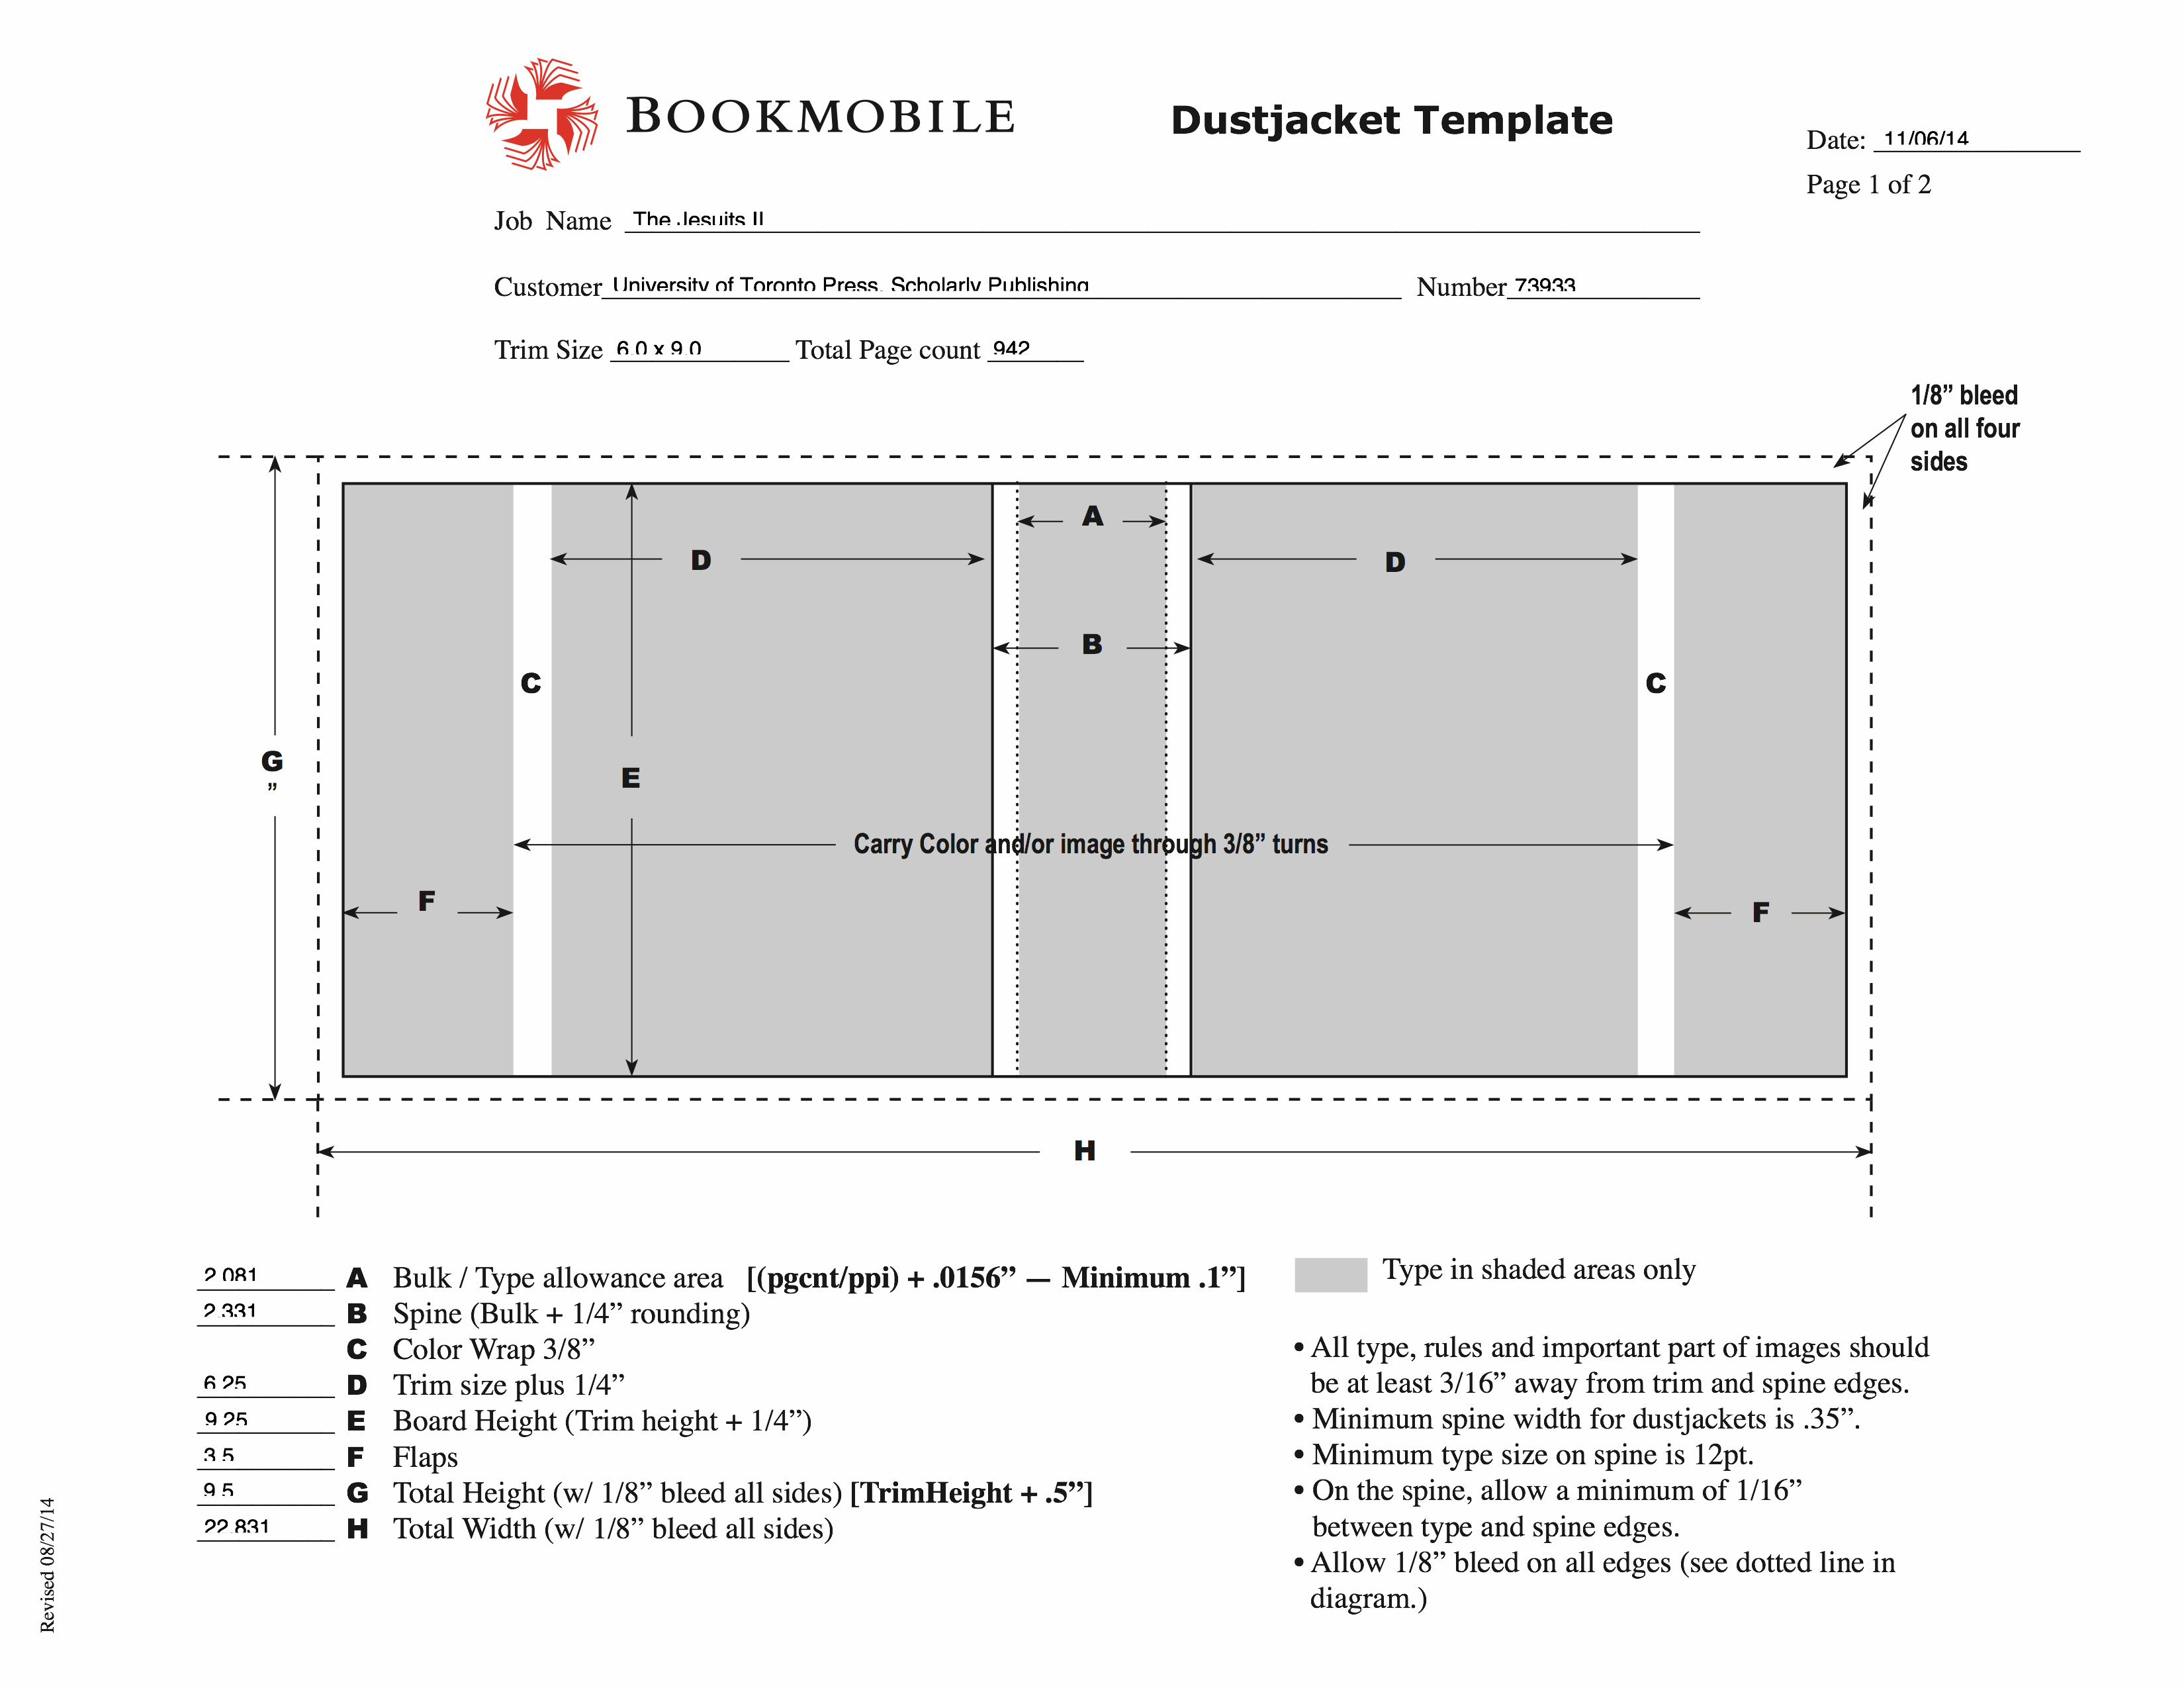
Template for the dustjacket shown at the top of the page.
Asking for Trouble:
Running Critical Design Elements to the Edge of the Dust Jacket
Because dust jacket trimming and wrapping processes have fairly large tolerances, and because the human eye has an amazing ability to detect non-parallel lines, running a straight-line design element parallel to any edge of a jacket within about 1/4″ of the edge is dangerous. The eye will instantly detect the converging lines. A frame on the front, spine, or back is even worse, as each edge of the rectangle will likely appear askew unless, by random chance, the frame was both centered and its edges square with the trimmed edge of the book—which is unlikely to happen.
Asking for Trouble:
Wrapping an Image Around the Front Panel, Spine, and Back Panel
When a dust jacket is laid out in InDesign and the designer is handed a horizontal image to use, there is the temptation to lay out the image all the way across the whole jacket from back panel on the left, across the spine, and across the front panel on the right. This might look cool on the screen, and on the printed dust jackets before they are wrapped, but it is a dead end once the jacket is wrapped on the book: the person viewing the book can only see two surfaces at most. Plus—and this is based on personal experience—the areas of the image suitable for laying type over always seem to be wrong place. That said, of course, there is no design rule that shouldn’t be broken under the right circumstances.
Checklist for Dust Jacket File Prep
- Make the flaps the height of the pages, plus 1/4″. Make them around 3-1/2″ wide–the template your printer provides should give some guidance on this.
- Make sure the front panel and back panel are exactly the same size as pages of the book, plus 1/4″ vertically and 1/4″ horizontally.
- Extend any bleeding color backgrounds or images on the front and back panels around onto the flaps by a minimum of 3/8″.
- Allow 1/8″ bleed around the entire edge of the flat dust jacket: run any color areas or images into the bleed area.
- Avoid straight-line graphic elements parallel to the trim edge and within 1/4″. Ditto frames within the front cover, spine, or back cover.
- Request a dust jacket template from your printer and follow it exactly.
- If you have concerns about how things are fitting, print out a dummy jacket at 100%, splicing if necessary, and wrap on a book of the same measurements.
For more about file prep, see my post Why We Have to Do Prep Work on “Print-ready” Files.
Need a quote or more information?
I’d be happy to answer questions. Contact me via email.